If you’re new to cycling or transitioning from flat pedals, you will have heard about clipless pedals and wondered what they are all about. Despite their somewhat misleading name, clipless pedals allow you to “clip in” using special cycling shoes with cleats that attach to the pedals. This system creates a secure connection between your feet and the bike, offering several advantages over traditional flat pedals. By keeping your feet locked in place, clipless pedals improve pedaling efficiency, allowing you to apply power throughout the entire pedal stroke—not just on the downward push but also on the upward pull. This leads to better energy transfer, less fatigue, and ultimately, a smoother and more powerful ride.
However, if the thought of being “locked in” to your pedals makes you a bit nervous, you’re not alone! Many beginners worry about falling over when they can’t unclip in time or struggling to get their feet in and out of the pedals smoothly. It’s completely normal to feel intimidated at first, but with the right setup and a bit of practice, clipless pedals can become second nature. Even experienced cyclists have had their fair share of awkward falls when learning, so don’t let that discourage you.
When I first used clipless pedals, I learned the hard way about initially adjusting the pedals’ tensions – At a 4-way traffic junction red light when the bike started leaning to the opposite side of my “down foot” and I could not release my other foot in time!! A lot of car horns started tooting!! Lol!!
The good news? Setting up clipless pedals is easier than it seems – installing your pedals correctly, adjusting your cleats for comfort, and practicing clipping in and out, you’ll be riding confidently in no time. In this guide, I’ll walk you through the entire process, making sure your first experience with clipless pedals is smooth, safe, and frustration-free.
I decided to write this guide after browsing online myself for advice about installing and setting up clipless pedals onto my own bike… Only to end up having a few different web pages open with their own “snippets of advice” that needed to be pieced together! I intend this article to be a one-stop guide providing ALL the required advice and information to successfully guide you through installing your new clipless pedals!
Please note that with this website being all about mountain biking, I will be only be referring to clipless pedals for mountain biking – referencing Shimano SPD and Shimano-compatible clipless pedals as that is the only type I have used.
Understanding Clipless Pedals and Cleats
If you’re new to clipless pedals, the name itself can be confusing. Why are they called “clipless” when you actually clip in? The term dates back to early cycling when most riders used toe clips—cages with straps that secured their feet to the pedals. And, anyone who remembers using these toe clips will surely know how fiddly they were having to adjust the straps all the time! When modern cleat-and-pedal systems were introduced, they eliminated the need for toe clips, hence the term “clipless.” However, the irony is that you do, in fact, “clip in” by securing your shoe cleats to the pedals. This system creates a firm connection between your feet and the bike, improving control, efficiency, and power transfer.
Types of Clipless Pedal Systems
Regarding mountain biking, there are basically 3 main brands of clipless pedals to consider – Shimano, Crank Brothers, and Look. And each brand has their own clipless system while Look X-Track pedals and cleats are also Shimano-compatible.
And, as I mentioned earlier, this article will be about setting up Shimano and Shimano-compatible clipless pedals as this is the only system I have used. If you are looking for advice for setting up another system, I am afraid this article will not be helpful for you.
So, the Shimano clipless system for mountain biking is known as SPD – Shimano Pedaling Dynamics. This system is popular among mountain bikers, gravel riders, commuters, and even some road cyclists. SPD pedals are two-sided, meaning you can clip in on either side of the pedal, making them easy to use in stop-and-go situations. The SPD cleats are two-bolt cleats and are small and recessed into the sole of the shoe, allowing you to walk comfortably when off the bike.
Choosing the Right Cleats for Your Pedals
Once you’ve picked your clipless pedal system, the next step is choosing the correct cleats. Each pedal brand and type is only compatible with specific cleats, so it’s essential to match them correctly.
When purchasing a new set of Shimano clipless pedals, the package already includes a pair of cleats for your shoes, most commonly Shimano SH51 cleats, ensuring you are equipped with the correct cleats.
However, if you ever need to replace the cleats, cleat sets can also be purchased separately, saving the need to purchase a whole new set of pedals. So here is a brief rundown of the Shimano and Shimano-compatible MTB Clipless pedals and cleats.
- Shimano SPD Cleats (Mountain Bike & Commuter Cleats) – Typically available in two versions: SM-SH51 (single-release) and SM-SH56 (multi-release). The SH51 cleats require a firm outward twist to release, while the SH56 cleats allow for easier release in multiple directions, making them more beginner-friendly.
- Look: X-Track cleats (equivalent to SH51 cleats) & X-Track Easy cleats (equivalent to SH56 cleats)
- Both brands of cleats are 2-bolt SPD cleats typically used for mountain biking.
What is the difference between the Shimano SH51 and SH56 cleats?
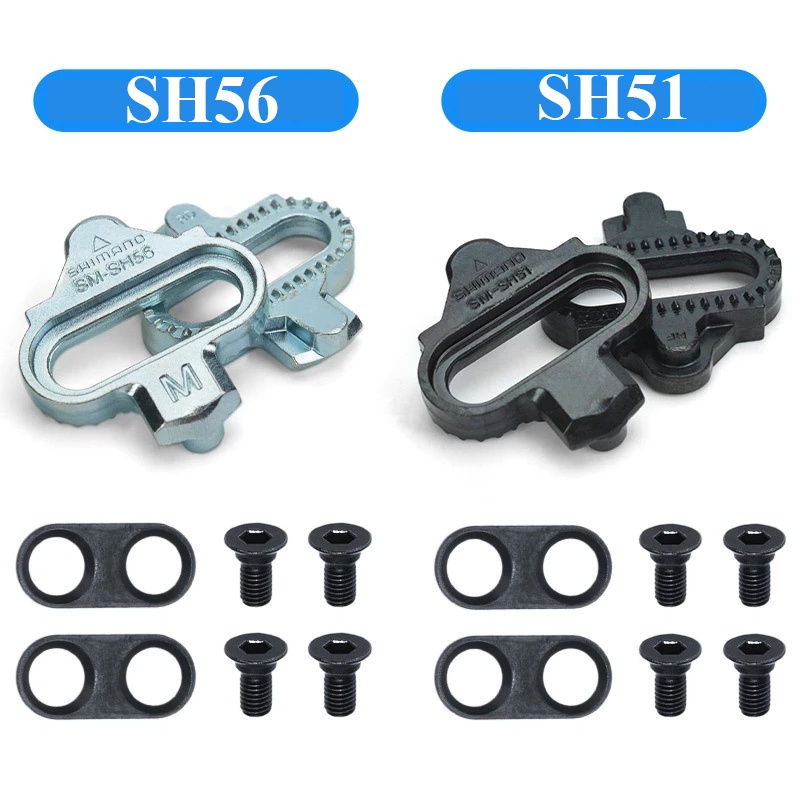
Considering the 2 cleat versions look identical, the easiest way to identify which cleat you have is the cleat’s colour. Usually, the SH51 cleats are black, while the SH56 cleats are silver. However, my current SH51 cleats are actually silver!
As previously mentioned, the SH51 cleats have a single direction to release your feet: by smoothly rotating your heel outwards away from your bike disengaging the cleat from the pedal mechanism. This one directional release also applies to the Look X-Track cleats.
SH56 cleats can be released from the pedal in other directions as well as rotating your heel out. You can also roll your shoe towards the outside of your foot or even pull up vertically to release your shoe. This multi-directional release feature is also available with the Look X-Track Easy cleats.
The multiple release options of the SH56 cleats can increase your confidence as a beginner as you are less likely to get stuck in your pedals and fall over when coming to a stop. This could also be a disadvantage as you could unwittingly unclip from your pedals while riding rough, off-road terrain.
This unwanted unclipping gives the SH51 cleats an advantage. Because of the one-directional release, even if the pedal tension is lowered to its minimum to make unclipping easier, you will remain clipped in while pedaling. While with the SH56 cleats, it could be tough to utilize the full pedaling cycle due to unwanted unclipping vertically.
SPD CLEAT FLOAT
Most clipless pedal systems and cleats have a set amount of sideways, lateral movement allowed by the cleat in the pedal before your foot disengages with the pedal. This amount of slight foot movement while clipped in is known as Float. The amount of float varies between brands, even between Shimano and Look cleats, even though they are compatible.
Float can allow for small, natural foot movements during pedaling helping riders with knee or foot alignment issues to find a more comfortable and efficient pedaling position.
Shimano SH51 and SH56 cleats both offer 4 degrees of float. While the Look X-Track and X-Track Easy cleats offer 6 degrees of float.
By understanding these key differences, you can confidently choose the right cleats for your clipless pedal system depending on your riding style and your level of confidence with clipless pedals. In the next section, we’ll walk through what you need to get started and how to install your pedals correctly.
What You’ll Need
Before you start setting up your clipless pedals, it’s essential to gather all the necessary equipment. Having the right tools and components will make the installation process smooth and ensure that your pedals function correctly from the start. Here’s what you’ll need:
- Clipless pedals and Cleats (compatible with your pedals)
- Cycling shoes
- Allen wrench or pedal spanner
- Grease (for pedal threads) and cloth
Clipless Pedals and Cleats
The most important piece of equipment is, of course, your clipless pedals, along with the correct cleats. When purchasing new clipless pedals, a pair of cleats is also provided to ensure you have the right cleats for the pedals. However, if you somehow purchase pedals and cleats separately, make sure they are compatible.
Cycling Shoes (Compatible with Your Cleats and Pedals)
Clipless pedals require specific cycling shoes with the correct mounting system for cleats:
Mountain Bike / Gravel / Commuter Shoes (For SPD Cleats) feature a two-bolt cleat mounting system built into the sole of the shoe around the ‘ball of the foot’ area. This cleat area is also recessed within the shoe’s rubber sole making them easier and more comfortable to walk in.
Allen Wrench or Pedal Spanner/Wrench
To install and adjust your pedals and cleats, you’ll need the proper tools:
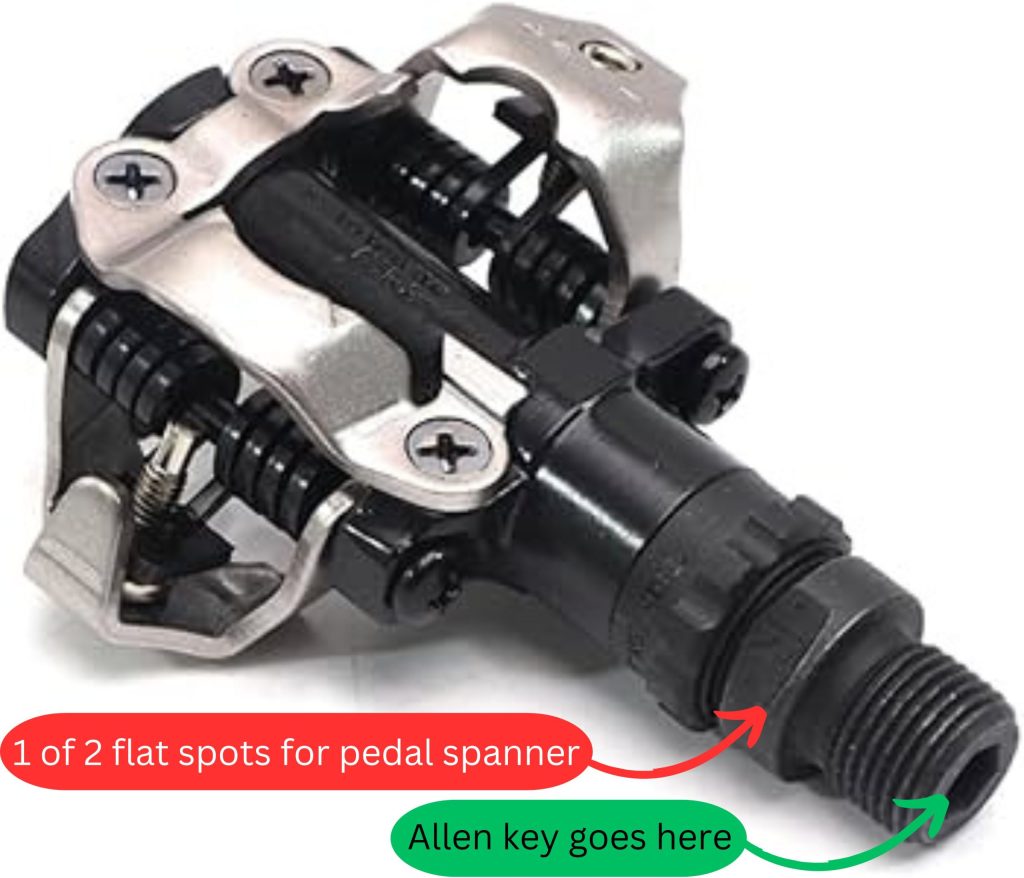
- Allen Key (Hex Wrench) – Most clipless pedals require a 6mm or 8mm Allen Key/ Hex Wrench to install them onto the crank arms.
- In this case, Allen Key/ Hex Wrench sizes are: Shimano – 6mm; Look – 8mm
- The cleats require a 4mm Allen Key/ hex wrench to install and adjust the cleats onto your shoes.
- Pedal Spanner/Wrench – Check your pedal’s axle for a flat spot to accept a 15mm pedal specific spanner/wrench.
Having the correct tools ensures that you can properly tighten and adjust the pedals and cleats without damaging them.
Grease (For Pedal Threads) & Cloth
Use a clean cloth to clean the pedal threads and the threads on the crank before applying a small amount of bike grease or anti-seize compound to the pedal threads before installation. This prevents the pedals from seizing or getting stuck in the crank arms over time, making future removal much easier.
Why use grease?
Grease prevents the pedals from corroding and getting stuck due to moisture or dirt buildup. And it makes it easier to remove or replace pedals in the future.
A small dab on the threads before screwing in the pedals is all you need.
Final Thoughts
Having the right equipment will make the job much easier and your transition to clipless pedals much smoother. By ensuring that your pedals, cleats, and shoes are compatible and using the correct tools for installation, you’ll be set up for success. In the next section, we’ll walk through the installation process, so you can start riding with confidence!
Removing and Installing Your Clipless Pedals
Once you have gathered all the necessary tools and equipment, the next step is to install your new clipless pedals. While this may seem like a simple task, it’s important to do it correctly to ensure a secure and smooth ride. Below, we’ll walk you through the process step by step.
Removing Old Pedals (Understanding Reverse Threading)
Before you can install your new clipless pedals, you’ll need to remove your old ones. This process is straightforward but requires attention to detail, especially when dealing with the left pedal, which is reverse-threaded to prevent it from loosening, maybe even totally unscrewing from the crank while riding!
Identifying the Left and Right Pedals
- Right Pedal (Drive Side) – This is the pedal on the same side as your bike’s chain and has a normal (right-hand) thread. It unscrews counterclockwise as you look at the crank from the right side.
- Left Pedal (Non-Drive Side) – This pedal is on the opposite side of the chain and has a reverse (left-hand) thread. It unscrews clockwise as you look at the crank for the left.
The pedal removal method I am about to reveal is a simple, straightforward method that actually works for both sides and removes any worries about possibly damaging the threads by trying to unscrew the wrong way.
You do not even need to use a bike stand for this method. Standing over your bike as if you have stopped is best to hold your bike in place and you can also apply some downward pressure on the pedal that will be removed.
Taking the RIGHT pedal off
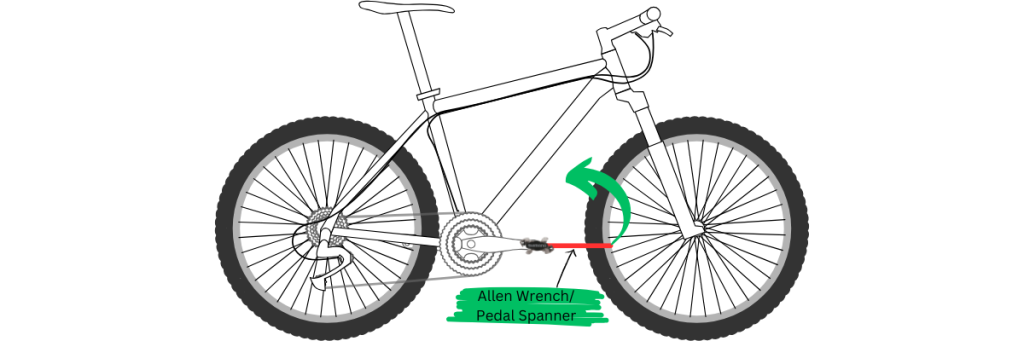
Standing over your bike, with an allen key/ hex wrench or pedal spanner/wrench at the ready, rotate the right crank and pedal so that it is facing forward to the front of your bike.
- Using the Allen Key/ Hex Wrench place it into the ‘hex socket’ on the pedal’s axle on the inside of the crank arm, making sure the long arm of the Allen Key is pointing forward in line with the crank arm and pedal.
- If using a Pedal Spanner/Wrench, place it on the flat spots of the pedal’s axle, ensuring it is pointing forward to the front of your bike.
Placing your right foot onto the pedal lightly, pull the tool you are using back towards you. Once you feel the initial release, take your foot off the pedal and continue to unscrew to remove it. Done! And now to remove the left pedal which confuses people due to its reverse thread!
Taking the LEFT pedal off
The beauty of this method to remove pedals is that you do exactly the same thing on the left side as you did with the right side!
Again, standing over your bike, rotate the left crank and pedal so that it is facing forward to the front of your bike.
Then, place whichever tool you will use onto the pedal axle making sure it is also pointing forward in line with the crank to the front of your bike. Place your left foot onto the pedal lightly and pull back on the tool towards you to release the pedal and then continue to unscrew the pedal to remove it. Done!
If the pedals are stuck and just won’t budge, apply some penetrating oil (such as WD-40) and let it sit for a few minutes before trying again.
The beauty of this simple method is that it eliminates any worries about the “clockwise & counterclockwise’ threading of the pedals! Because the left pedal’s reverse thread is opposite to the right pedal, basically a mirror image, it makes this method very easy to remember and apply.
Installing New Clipless Pedals (Ensuring Correct Left/Right Placement)
Getting the left and right pedals in the correct position is crucial, as forcing the wrong pedal into the wrong side can damage your crank arms.
Most pedals have an “L” or “R” stamped onto the axle. But, if there is no indication which pedal “L” or “R”, you will need to check the pedal and its side profile to determine its front leading edge.
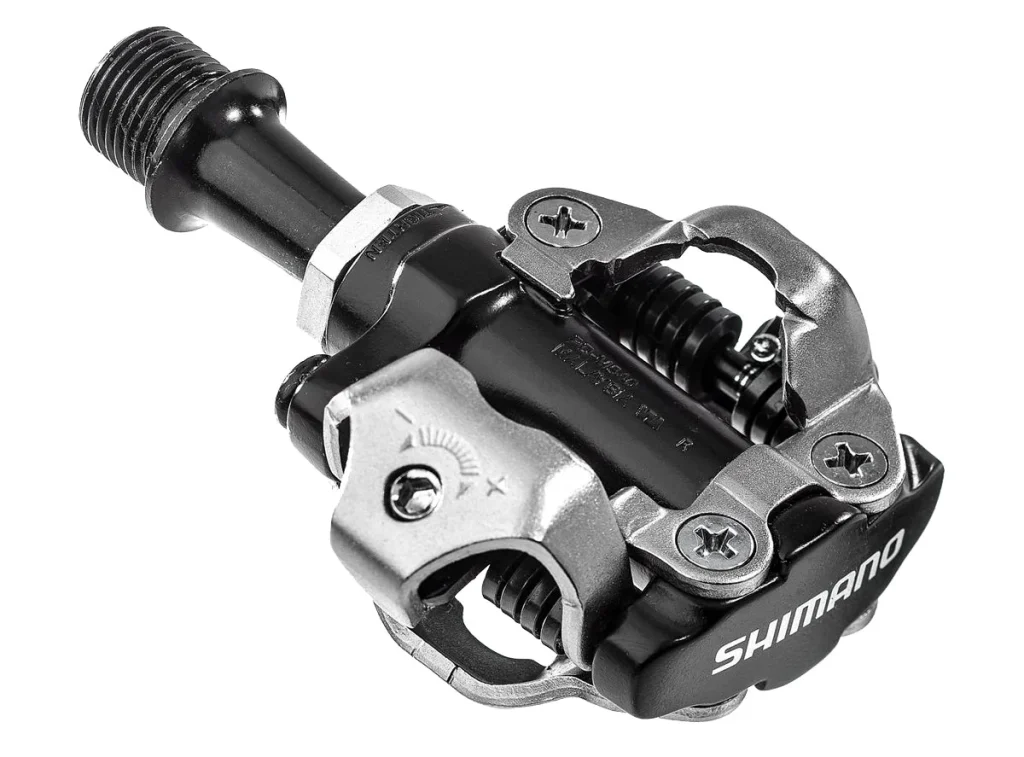
However, as we are concentrating on Shimano’s clipless pedal system using SH51 and SH56 cleats, here is an illustration of how you can determine which pedal goes to which side:
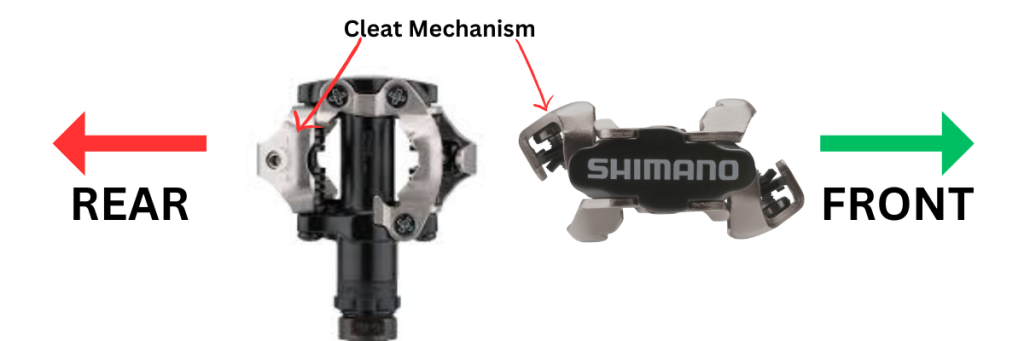
As you can see from the above image, the cleat mechanism is at the rear of the pedal. This is because of the methods required to clip in and clip out of the pedals. The front cleat plate is a fixed plate and holds the front of the cleat in place while the cleat mechanism at the rear of the pedal allows your foot movements to clip your foot in or out.
Also, when installing the pedals, remember that the Right pedal screws in clockwise, while the Left pedal screws in counterclockwise. This is when you are on the specific side of the bike and looking at the crank while installing the pedal.
Once you have determined which pedal is “L” or “R”, it is now time to prepare your pedals for installation and applying some grease to their threads.
Applying Grease to Pedal Threads
Once the old pedals are removed, it’s important to apply bike grease (or anti-seize compound) to the new pedal threads before installing. This prevents the pedals from seizing or getting stuck over time, making future removal much easier.
Why Apply Grease?
- Prevents corrosion and rust, especially if you ride in wet or humid conditions.
- Makes it easier to remove pedals later when you need to replace or adjust them.
- Reduces creaking noises that can occur if dry metal threads rub together.
How to Apply Grease
Before applying grease to the pedal threads, wipe the threads with a clean cloth to ensure the threads are clean of any dirt or foreign material before installing them. Use a small amount of bike grease and apply a thin layer to the threads of both pedals using your finger or a brush.
Wipe off any excess to keep things clean.
Tip: If you have pedal washers, place one on each pedal axle before installing. The washer will stop the pedal seizing into the crank over time which could make it difficult to remove the pedal, while also preventing potential damage to both the crank and pedal surfaces.
Install Your Clipless Pedals
Installing new pedals onto your bike uses the same method as removing the old pedals, only IN REVERSE using the Allen Wrench/ or Pedal Wrench.
This means that instead of pulling your Allen Wrench/ Pedal Wrench towards you and the back of the bike when removing the pedals, you will now turn the Allen Wrench/ Pedal Wrench FORWARD to the front of the bike to install the pedals.
Installing the RIGHT Pedal
Now that the Right pedal is ready to install, I like to use the Allen Wrench through the “pedal hole” on the crank arm as I can safely ‘guide’ the pedal’s axle onto the crank arm and start turning it FORWARD towards the front of the bike gently to ensure the pedal goes in smoothly. As you are looking at the crank you will be turning the Allen Wrench clockwise to screw the pedal onto the crack arm.
Once the pedal is completely screwed onto the crank arm, there is no need to “overtighten” it as the pedals naturally “self-tighten” while you are pedaling.. Just give the Allen Wrench/ Pedal Wrench one last little bit of pressure and the pedal will be securely installed onto the crank arm.
Installing the LEFT Pedal
The method to install the Left pedal is exactly the same as installing the Right pedal.
Because of the pedal’s “reverse/ counterclockwise” thread and you are on the left side of your bike to install the pedal, you again safely ‘guide’ the pedal’s axle onto the crank arm using the Allen Wrench. Again turn the Allen Wrench FORWARD towards the front of the bike gently, ensuring the pedal goes in smoothly. Even though you are turning the Allen Wrench counterclockwise to install the pedal, you are still turning it Forward towards the front of the bike as you look at your bike.
Again, once the pedal is screwed completely onto the crank arm, just add one more little push on the Allen Wrench to make sure it is securely installed but not overtight.
Now To Check The Pedals
Once you have installed both pedals, grab a cloth and clean off any excess grease from the crank arms and pedal axles.
Your final check is to spin the cranks one side at a time while holding the pedal to ensure the pedals move freely.
Final Thoughts
Installing clipless pedals properly ensures a secure, efficient and enjoyable riding experience. By removing your old pedals carefully, applying grease to prevent future issues, and installing the new pedals correctly, you set yourself up for a smooth transition to clipless cycling.
This method makes it so much easier, and safer for your bike parts, because there is no pressure to remember which pedal has a clockwise or counterclockwise thread. You just need to know the correct pedal for each side and remember, regardless of which side:
REMOVING PEDALS – Turn the Allen Wrench/ Pedal Wrench BACK towards you.
INSTALLING PEDALS – Turn the Allen Wrench/ Pedal Wrench FORWARD towards the front of the bike.
I hope you find this simple trick to easily and safely remove/ replace mountain bike pedals helpful for you and eases your worries for your next pedal replacement attempt! In the next section, we’ll go over how to attach your cleats to your cycling shoes, ensuring a proper fit and comfortable riding position.
Attaching Cleats to Your Cycling Shoes
Now that your clipless pedals are installed, the next step is to attach the cleats to your cycling shoes. Proper cleat positioning is crucial for comfort, efficiency, and injury prevention. A poorly positioned cleat can lead to knee pain, discomfort, or inefficient pedaling, so taking the time to set them up correctly will pay off in the long run.
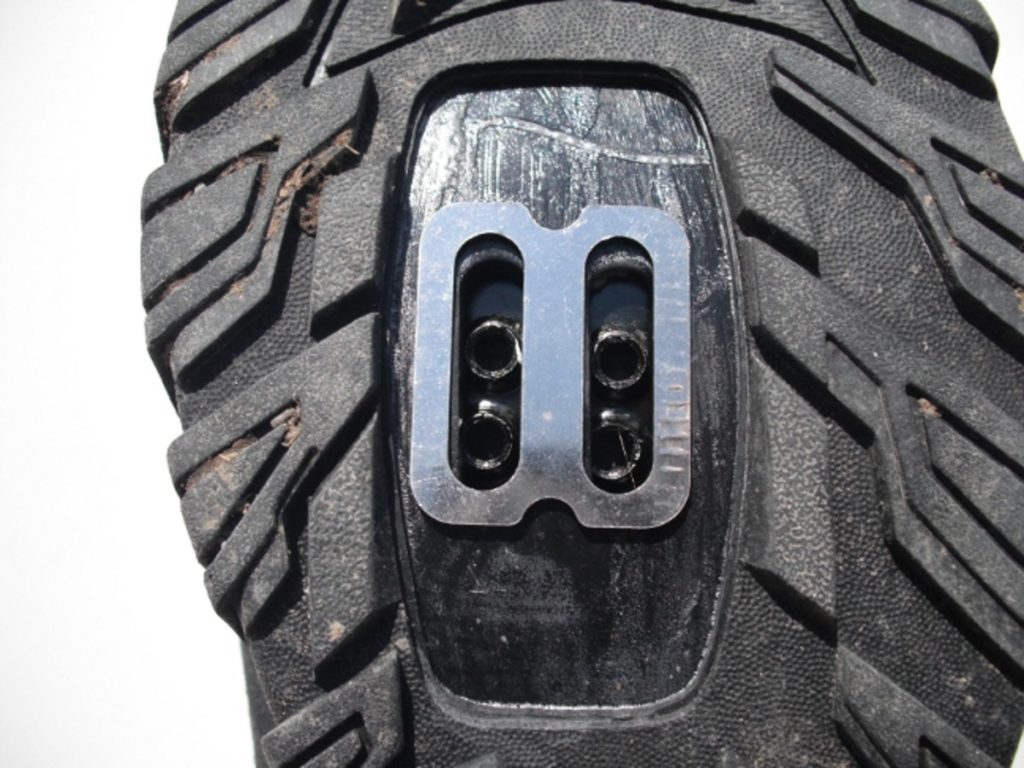
On the sole of your SPD cleat compatible cycling shoe, there is a slightly recessed area, located basically where the ball of your foot will be, with 2 long slots. And under these 2 slots will be a metal plate with either 2 or 4 holes – where you will attach the cleat.
Removing An Old Set Of Cleats
If you are going to replace an old set of cleats, you’ll most likely find that the face of the cleat bolts are packed with dried mud, preventing you to getting the Allen Wrench in to remove them. Here are a couple of suggestions to remove this dried mud:
- Use a drill with a small drill bit to drill the dirt out.
- Dampen the dried mud with water and use a small pick or nail to scrape the mud out.
Once the bolt face is cleared of dried mud, you can proceed to remove the bolts and old cleats. Marking the position of the old cleats with a marker or tape before removal is a good idea to ensure your new cleats are installed directly into your desired position.
Using a 4mm Allen Wrench, turn it counterclockwise to loosen the bolts, being careful not to strip the bolt threads. If the bolts are stuck and just won’t budge, apply some penetrating oil (such as WD-40) and let it sit for a few minutes before trying again.
Once the bolts are removed, you may need to carefully pry the cleat from the sole of the shoe using a flat-head screwdriver or similar tool so as not to damage the cleat or the shoe.
Positioning Cleats for Comfort and Efficiency
The position of your cleats affects how power is transferred from your legs to the pedals. A well-positioned cleat provides a natural foot position, prevents strain on your joints, and optimizes pedaling efficiency.
If you are replacing and old set of cleats, then you should already know your optimal cleat position on your shoes as the previous cleats will have ‘left their mark’ on the sole of the shoe to show exactly where to place the new cleats. So you can skip through this section about cleat positioning.
However, if this is your first time installing and setting up clipless pedals and cleats, let’s get you going the right way so you can get set up and hit the trails with confidence!
Installing The Cleat Onto Your Shoe
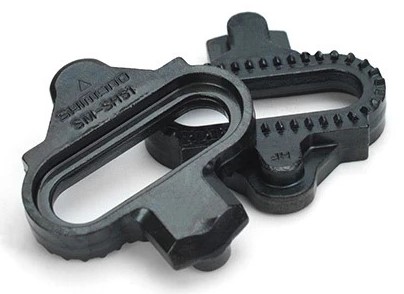
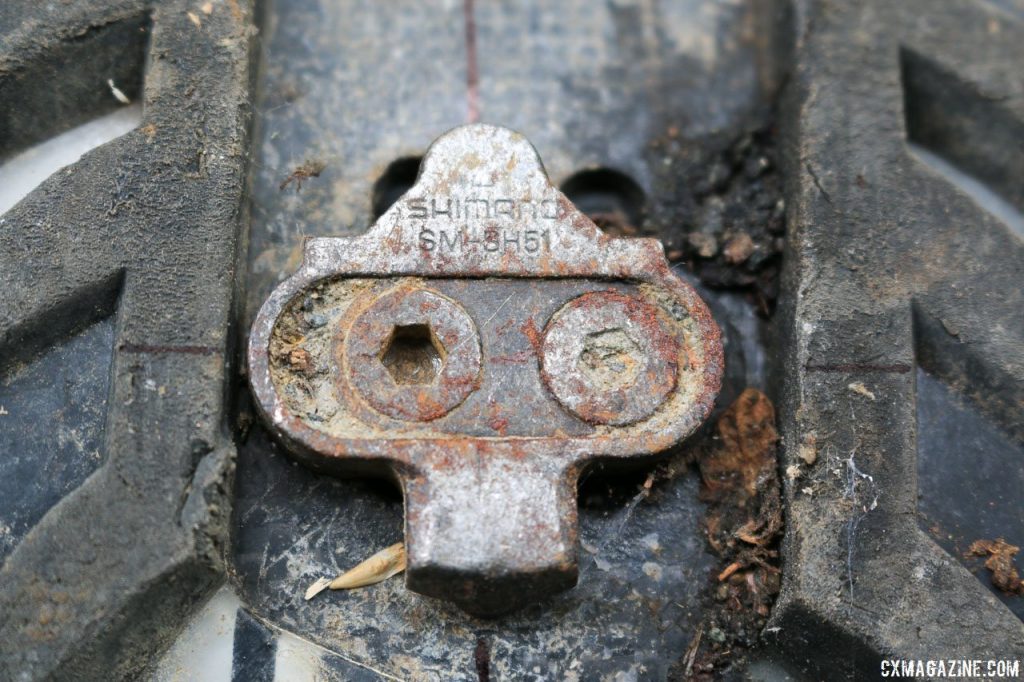
As you can see from the image, the side of the cleat that contacts the shoe has a “toothed design’ looped around the edge of the bolt hole. This is so that the cleat can grip the sole of the shoe to aid in staying in position and avoid any unnecessary cleat movement when pedaling if a bolt may become loose.
Also, the triangular section, shaped like an arrow, is the front of the cleat that will point to the front of the shoe.
Before placing the bolts, make sure they are clean and apply a tiny bit of grease to the thread to make sure they don’t seize in place over time, while also helping to remove them again in future.
Place and line up the cleat onto the cleat plate on the sole of the shoe with this ‘arrow’ section pointing forward and install the bolts tightening them just enough to hold the cleats in place.
How to Find the Correct Cleat Position
Firstly, we will talk about the “vertical position” of the cleat on the cleat plate, along the line of the shoe – in a general central position, or slightly forward or backward of the pedal’s axle. To determine this position for your new cleats, you need to put your new bike shoes on and locate the central point of the ball of your foot on the side of your shoe. Use a pencil, or other temporary marker, to mark this point on the edge of the shoe’s sole so that you can then use a ruler, or other straight edge, to determine this location on the cleat plate for installing the cleat.
Having the ball of your foot positioned in line with the clipless pedal’s axle offers the optimal foot position as it allows for the best balance between power and performance. When traversing a lot of off-road trails, you actually spend most of your time standing using your whole body to balance and maneuver your bike across and through the varied terrain. So, with your foot in this position, your weight is transferred directly through the ball of your foot to the pedal axle and hardly straining any muscles/tendons in any other part of your foot, which may happen if you position the cleat a little differently.
However, if you want to try and test different foot positions, here is the common concensus:
- For more power and sprinting efficiency, position the cleat slightly forward of the ball of your foot.
- For more comfort and endurance riding, position the cleat slightly backward.
You only need to move the cleat forward/backward by just a few mm to feel the difference of the cleat position. This usually involves a fair bit of trial and error, especially for beginners trying to find the optimal foot position on the pedal.
Once you are happy with this “vertical position” of the cleats, you only need to tighten them enough so they don’t move! As we will now move on to adjusting them for your natural foot position.
As I mentioned earlier in this article talking about the cleats, the cleats have a small degree of lateral foot movement allowance when your shoes are clipped into the pedals – also known as Float.
This amount of Float allowance may be enough for you to find your comfortable foot position without needlessly unclipping. But if not, you may need to adjust the cleat position slightly to accommodate your natural foot position.
Now that your new cleats are installed onto your shoes, it is now time to make your final positional adjustment so that your feet are in their natural, most comfortable position for you.
Adjusting Cleat Angle to Avoid Knee Strain
Cleat angle, also known as float adjustment, determines how much your foot can rotate while clipped in. If your cleats are misaligned, it can cause knee pain or discomfort over time due to needing more effort to unclip your feet from the pedal. Once aligned, the float angle is restored to normal making unclipping your feet much easier.
Before adjusting the cleat angle, you need to find out how your feet are naturally aligned so that you can determine how much adjustment, if any, may be needed.
A simple way to check your natural foot position is to sit on a bench or high stool and, while letting your legs hang freely, check if your feet naturally point straight, slightly outward, or slightly inward.
You can experiment and adjust the angle of the cleats to match your natural foot position:
- If your foot points out, turn the point of the cleat inwards towards the inner side of your shoe.
- If your foot points in, turn the point of the cleat towards the outer side of your shoe.
You then need to test and adjust the cleat position as needed until you find your optimal foot position to ensure you have your most comfortable riding position setup.
If, after riding, you feel any knee discomfort:
- If pain occurs on the inside of the knee, try turning your toe outward slightly.
- If pain occurs on the outside of the knee, try turning your toe inward slightly.
Tightening Cleats Securely but Allowing for Future Adjustments
Once you are happy that your cleats are positioned correctly, you need to tighten them securely enough to prevent movement, but not so tight that you can’t make future adjustments.
Make sure both SPD cleat bolts are tightened equally to keep the cleat in the correct position and to avoid rocking or uneven wear. You may need to readjust the cleats again after a few rides, as your new cleats and bolts ‘settle in’ to their positions.
Final Thoughts On Cleat Positioning
Proper cleat positioning and alignment are essential for an efficient and pain-free mountain biking experience. By positioning cleats correctly, adjusting the angle for knee comfort, and tightening them securely while allowing for adjustments, you set yourself up for a smooth, comfortable ride.
In the next section, we’ll cover how to practice clipping in and out safely, so you can build confidence before hitting the road and trails!
Adjusting Pedal Tension
Once your clipless pedals and cleats are installed, the next crucial step is adjusting the pedal tension. Pedal tension determines how much force is required to clip in and unclip, which directly affects your confidence and comfort while riding.
If the tension is too high, it may be difficult to unclip quickly, increasing the risk of falling. If it’s too low, your feet may accidentally disengage from the pedals while riding. Beginners should start with the lowest tension setting, with your dominant ‘down’ foot at least, to make clipping in and out as easy as possible.
How Pedal Tension Affects Clip-In and Release Difficulty
Most clipless pedals allow you to adjust the spring tension that controls the force required to engage and disengage your cleats. Understanding how this affects your ride will help you find the right balance between foot security and ease of use.
Effects of Higher Pedal Tension
- Stronger foot retention – Your shoes stay securely locked in, reducing accidental unclipping.
- More power transfer – Ideal for sprinting or aggressive riding.
- Harder to clip in and out – May cause frustration and increase the chance of falling when stopping.
- More strain on your knees and ankles – Requires more force to unclip, which can be uncomfortable for beginners.
Effects of Lower Pedal Tension
- Easier to unclip – Makes stopping and starting smoother, reducing the risk of falls.
- Less strain on joints – Reduces the force needed to twist out of the pedal.
- Less secure connection – If the pedal tension is too low, your feet might unclip unexpectedly, especially during hard pedaling or rough terrain.
For beginners, it’s best to start with the lowest tension setting for the foot you will unclip first when you are about to stop, as it provides an easier learning curve and helps build confidence. Once you become comfortable, you can gradually increase the tension for a more secure connection.
My personal advice for clipless pedal set-up
Like all new clipless pedal users, I learned the hard way about initially adjusting the pedals’ tensions – At a 4-way traffic junction red light when the bike started leaning to the opposite side of my “down foot” and I could not release my other foot in time!! A lot of car horns started tooting!! Lol!!
So, I hope my pedal set-up advice learned from my own experience will help make your use of clipless pedals that much more enjoyable and confidence-boosting without learning the hard way!
This pedal set-up advice is referring to Shimano SPD-compatible clipless pedals, which I have only used. If you have acquired another brand of pedal, please refer to their set-up recommendations.
The following set-up advice for clipless pedals is especially for brand new pedals, where the pedal plates and shoe cleats still have the new, unused, sharp edges to them. This adjustment will make your transition from regular/ flat pedals to clipless pedals so much easier.
Firstly, realize which foot you always take off the pedals first when you are about to stop – your “down foot”. The pedal for this side will be the main pedal to be adjusted.
On the “down foot” pedal, you will see an Allen Key screw, usually with a “+’ and “-“ sign above it. Taking the appropriate Allen Key, usually 3mm, turn it to the “-“ as far as you can, reducing the pedal’s spring tension to its minimum. As you turn the screw, you will feel the adjustment will be in small, incremental ‘clicks’.
This makes it much easier to unclip while still providing enough tension to keep your foot clipped in to the pedal while cycling.
Now for the other pedal!
For me, the pedal for the foot that usually stays connected to the pedal when standing, has a slightly tighter tension than the other side as it is not taken off the pedal as much and usually does not need to be unclipped as quickly or suddenly.
As I said, pedal adjustment is done in small, incremental clicks. Start by adjusting the other pedal by just 2-3 clicks first and then test clip/unclip while standing to see if the pedal cleat tension for quick release feels right for you. If not, try another click or two until you are satisfied. But, if it ends up too loose, then adjust the tension back until you find the right tension.
Over time, the pedal plates and shoe cleats will start to wear down a little, losing their new, sharp edges and this may make the pedal/cleat connection feel a little looser than when you started using the pedals. All you need to do when you feel this looseness is re-adjust the tension in the pedals to your desired level to continue enjoying your biking adventures.
Final Thoughts
Adjusting pedal tension is a simple but crucial step for a safe and enjoyable experience with clipless pedals. Beginners should start with the lowest tension setting for your “down foot” to make unclipping easier and reduce the risk of falls. As confidence grows, tension can be gradually increased for a more secure connection.
Now that your pedals are properly adjusted, the next step is practicing clipping in and out safely—let’s go over that next!
Mastering your pedals is only half the battle; the real magic happens when you pair that new efficiency with proper body position. Check out our Mountain Biking Skills for Beginners guide to learn how to adapt your ‘attack position’ and braking now that you’re officially clipped in.
Practicing Clipping In and Out
Now that your clipless pedals are installed, cleats are properly positioned, and pedal tension is adjusted, it’s time to practice using them! Clipping in and out can feel awkward at first, but with a little patience and practice, it will soon become second nature.
The key to mastering clipless pedals is to start in a safe and controlled environment before hitting the road or trails. This section will guide you through the best ways to practice, step-by-step instructions for clipping in and out, and common mistakes to avoid.
Practicing on a Stationary Bike or with One Foot on the Ground
If you have access to a stationary bike or bike trainer, this is the safest way to practice. Since the bike is held in place, you can focus solely on the motion of clipping in and out without worrying about balance or falling.
- Get on the bike and position your feet over the pedals as if you were riding.
- Practice clipping in and out multiple times, focusing on smooth, controlled movements.
- Once you feel comfortable, try alternating feet to develop the habit without thinking or worrying about it.
Practicing on a Flat, Open Area with One Foot on the Ground
If you don’t have a stationary bike, you can still practice in a safe, open space, such as a grassy area or an empty parking lot.
- Start by standing over your bike and clipping in with one foot while keeping the other foot on the ground.
- Practice twisting your foot outward to unclip, getting used to the movement before attempting to ride.
- Once you feel comfortable, sit on the saddle and practice clipping in and out with each foot to feel the movement properly in the actual seated position.
By practicing in a controlled environment first, you’ll build confidence and reduce the risk of falling when you start riding.
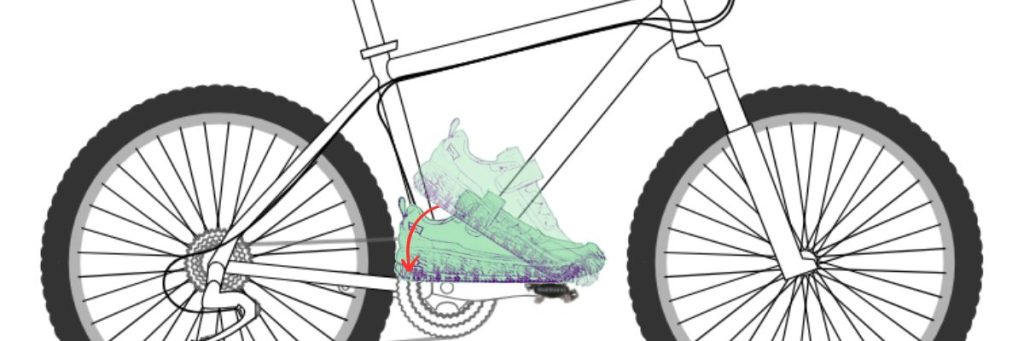
How to Clip In: Toe First, Then Press Down
Clipping in can feel tricky at first, but following a toe-first approach will make it easier.
Step-by-Step Guide to Clipping In
- Position the Pedal Correctly
Most clipless pedals do not “sit flat” when your feet are not on them. But because the clipless pedals are two-sided, you just have to put your foot onto the pedal to “flatten” it to a horizontal position, making it easier to guide the toe into place first.
- Insert the Front of the Cleat
Point your toe slightly downward and aim for the front of the cleat to engage with the pedal. You should feel the cleat slot into the front part of the pedal mechanism.
- Press Down Firmly
Once the front is in place, press down with your heel until you hear/ feel a click. This indicates that your shoe is securely clipped in.
- Check Your Foot Movement
Wiggle your foot slightly to ensure it’s properly engaged but can still move naturally within the pedal’s float range.
Pro Tips for Easier Clipping In
- Use your dominant foot first – Start by clipping in with the foot you naturally put down first when stopping.
- Keep pedal tension low – A looser tension setting makes it easier to engage the cleat.
- Look down if needed – At first, you may need to glance at the pedal, but with practice, you’ll be able to do it instinctively.
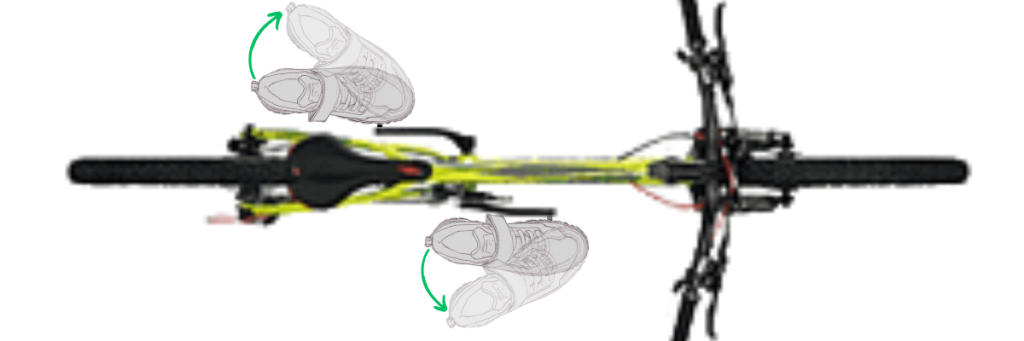
How to Unclip/ Clip Out: Twist Your Heel Outward
The most important skill to master with clipless pedals is unclipping quickly and smoothly, especially when coming to a stop.
Step-by-Step Guide to Unclipping/ Clipping Out
- Start by standing over your bike and clipping in with one foot while keeping the other foot on the ground.
- Practice twisting your foot outward to unclip, getting used to the movement before attempting to ride.
Once you are comfortable with the clipping/ unclipping process, you can move to cycling slowly in the safe area to practice clipping and unclipping while in motion.
Anticipate Your Stop
Before you come to a complete stop, prepare to unclip early so you don’t panic at the last second.
- Twist Your Heel Outward and rotate your heel away from the bike—this disengages the cleat from the pedal mechanism. The motion should be controlled but firm—not a sharp yank, just a smooth twist.
- Place Your Foot on the Ground as soon as you unclip for stability.
- Reclip When Ready
When starting again, start moving and repeat the toe-first clipping-in motion and repeat the unclipping.
Pro Tips for Easier Unclipping
- Practice twisting outward repeatedly while stationary to develop muscle memory.
- Start unclipping before you stop to avoid last-second panic.
If stuck, lean toward the unclipped side to try and avoid falling.
Common Mistakes and How to Avoid Them
Even experienced cyclists have had their fair share of awkward tip-overs when learning clipless pedals. It happens to the best of us and you will experience it sometime! Here are the most common mistakes beginners make—and how to prevent them.
Mistake #1: Waiting Too Long to Unclip
What happens? You stop first and then try to unclip, but panic when your foot won’t release fast enough, leading to a fall.
How to avoid it: Start unclipping a few seconds before stopping, so your foot is free and ready to place down on the ground when you stop.
Mistake #2: Forgetting Which Foot to Unclip First
What happens? You unclip one foot but instinctively try to put the other foot down, causing an awkward fall.
How to avoid it: Always unclip the same foot first (usually your dominant foot) and build a habit.
Mistake #3: Not Twisting the Heel Out Far Enough
What happens? You try to unclip but don’t rotate your heel outward far enough, leaving your foot stuck.
How to avoid it: Use a firm, deliberate outward twist—not just a small ankle movement.
Mistake #4: Overthinking It While Riding
What happens? You get distracted by focusing too much on clipping in and out, making your ride stressful.
How to avoid it: Relax and practice until clipping in and out becomes second nature. It will feel awkward at first, but you will soon be doing it without even thinking.
Final Thoughts
Practicing clipping in and out is essential for building confidence with clipless pedals. By starting in a stationary position, using a toe-first approach for clipping in, and mastering the heel twist for unclipping, you’ll quickly get the hang of it.
Remember, everyone struggles at first, but with a little patience, you’ll be riding confidently in no time!
Now that you’ve mastered clipping in and out, let’s move on to some real-world riding tips to ensure a smooth transition to clipless pedals!
Taking Your First Ride Using Clipless Pedals
Now that you’ve practiced clipping in and out while stationary, it’s time to take your first ride using clipless pedals! The key to a smooth transition is starting in a safe, controlled environment and gradually building your confidence before venturing into more challenging riding conditions like traffic or group rides.
This section will guide you through the best place to start, how to practice stopping and unclipping smoothly, and how to develop confidence before riding in high-pressure situations.
Starting in a Safe, Open Area
Before riding on the road, find a quiet, open space with a flat surface to practice in. A grassy field, empty parking lot, or a quiet cul-de-sac are great places to start. These areas provide plenty of space to maneuver without the pressure of traffic or obstacles.
Ideal Practice Locations:
- Empty parking lot – Flat, smooth surface with plenty of space.
- Grassy area – Softer landing if you fall while practicing.
- Quiet residential street – Minimal traffic and stop signs to practice real-world scenarios.
Once you find a suitable area, take a moment to mentally prepare before starting. Remind yourself that mistakes are part of the learning process and that every cyclist has had an awkward moment with clipless pedals!
Practicing Stopping and Unclipping Smoothly
One of the most important skills to master is unclipping smoothly before stopping. Many beginners wait until the last second to unclip, as if they were still using flat pedals, which increases the risk of tipping over and possibly resulting in a fall. The key is to anticipate stops early and unclip before you actually come to a halt.
Step-by-Step Guide to Stopping and Unclipping:
- Slow down gradually – As you approach a stop, reduce your speed smoothly instead of braking suddenly.
- Unclip early – Before you come to a complete stop, twist your dominant foot outward to unclip while still rolling slowly.
- Keep the unclipped foot ready – You can place your unclipped foot on the pedal without clipping in again so it’s ready to place on the ground as soon as you stop.
- Stop with balance – Once you come to a stop, place your unclipped foot on the ground for stability.
- Keep your other foot clipped-in –making it easier to start again.
Pro Tips for Easier Unclipping:
- Unclip several seconds before stopping – This gives you time to react smoothly.
- Choose your dominant “down foot” to unclip first – Always unclip the same foot first to build muscle memory.
- Practice stopping multiple times – Do short laps, stopping and unclipping as many times as you need to build confidence.
Building Confidence Before Riding in Traffic
Once you’re comfortable clipping in and out while riding in a controlled environment, the next step is to build confidence before riding in traffic.
Instead of jumping straight into busy streets, try the following progression steps to ease into real-world riding:
Phase 1: Short Loops on a Quiet Street
Ride around a low-traffic neighborhood where you can practice starting, stopping, and turning with little distraction from traffic. Focus on anticipating stops and unclipping early at intersections.
Phase 2: Riding with Stop Signs & Intersections
Introduce more stop signs or minor intersections to practice stopping, unclipping, and starting smoothly. If necessary, pull over and practice clipping in and out before entering intersections to boost your confidence.
Phase 3: Riding with Light Traffic
If you can, ride on a designated bike path or a road with a dedicated bike lane to get comfortable in a real-world setting. If there are no dedicated bike paths or lanes, try to stay on quieter roads with less traffic. Always keep 1 or 2 fingers on your brakes ready to brake instantly if needed and look ahead for potential stops so you can unclip in advance.
Phase 4: Joining Heavier Traffic & Group Rides
Once you’re fully comfortable with the clipping/unclipping process, gradually introduce yourself to busier roads or group rides where stopping and clipping in and out quickly becomes more important.
Pro Tips for Confidence on the Road:
Ride at your own pace – Don’t rush into traffic-heavy areas until you’re ready.
Lower cleat tension if needed – If you still feel hesitant, make clipping in and out easier.
Stay relaxed – Overthinking can make clipping in more difficult—keep calm, keep practicing and let muscle memory develop.
Phase 5: Finally Going Off-Road Biking
My biggest piece of advice for your first off-road venture with clipless pedals is to reduce the tension of the pedal that is NOT your dominant foot – the foot that would normally stay clipped when stopping on a road.
The reason for this being that off-road tracks and trails have uneven surfaces and obstacles and you will most likely need to suddenly unclip either foot quickly at any time.
Also, you may see groups of mountain bikers following each other closely on the trail, almost like a train. When starting out, DO NOT ride trails like this!! Those guys will be very experienced and know each others’ skill levels and abilites.
When starting to ride the off-road trails with clipless pedals, maintain enough distance between you and the biker in front to allow you enough time to unclip if needed, and avoiding a potential pile-up on the trail!
Final Thoughts
Taking your first ride with clipless pedals is both exciting and nerve-wracking, but by practicing in a safe area, anticipating stops, and building confidence gradually, you’ll quickly master the transition.
Remember, every cyclist has a learning curve when switching to clipless pedals, so be patient with yourself. By following this advice, you will soon be clipping in and out naturally without thinking!
Mastering your pedals is only half the battle; the real magic happens when you pair that new efficiency with proper body position. Check out our Mountain Biking Skills for Beginners guide to learn how to adapt your ‘attack position’ and braking now that you’re officially clipped in.
Troubleshooting Common Issues
Even after setting up your clipless pedals correctly, you might run into a few challenges as you get used to them. It’s completely normal! Many beginners experience difficulties clipping in or out, discomfort in their feet or knees, or issues with pedal tension. Fortunately, most of these problems can be easily fixed with a few adjustments.
In this section, we’ll go over common troubleshooting tips to ensure a smooth and pain-free experience with your clipless pedals.
Difficulty Clipping In or Out
Problem: You struggle to get your cleats to engage with the pedal or have trouble twisting your foot to unclip.
Possible Causes & Solutions:
Check Your Pedal Tension
Many clipless pedals have an adjustable tension screw that controls how hard or easy it is to clip in and out.
Solution: If you’re a beginner, set the tension to the lowest setting so you can engage and disengage the cleats more easily.
Ensure the Cleats Are Properly Aligned
If your cleats aren’t properly positioned on your shoes, they may not engage smoothly with the pedals.
Solution: Loosen the cleat bolts slightly, reposition the cleats, and tighten them again. Try small adjustments to see what works best.
Clean Your Cleats and Pedals
Dirt, mud, or debris can interfere with the mechanism, making clipping in and out more difficult.
Solution: Wipe down your cleats and pedals with a clean cloth and use a small brush to remove any buildup.
Use a Toe-First Approach When Clipping In
Beginners often struggle because they try to push straight down instead of using the correct method of using the toe-first method.
Solution: Point your toe slightly downward, engage the front of the cleat first, and then press down firmly with your heel.
Unclip Early When Stopping
If you wait until the last second to unclip, you might panic and struggle to twist your foot, and possibly end up falling over.
Solution: Start unclipping before you stop so you have plenty of time to disengage and be ready to stop.
Practice, Practice, Practice!
If clipping in and out feels awkward, don’t worry—it gets easier with time.
Solution: Practice on a stationary bike or in a safe area until the motion becomes second nature.
Foot Discomfort or Knee Pain (Adjusting Cleat Position)
Problem: You feel hot spots, foot numbness, or knee pain after riding with clipless pedals.
Possible Causes & Solutions:
Adjust Cleat Fore-Aft Position for Comfort
If your cleats are too far forward, it can put excessive pressure on the ball of your foot, leading to discomfort or numbness.
Solution: Move the cleats slightly backward toward the midfoot to distribute pressure more evenly.
Adjust Cleat Angle (Rotation) to Prevent Knee Pain
If your knees feel sore after riding, your cleats may be forcing your feet into an unnatural position.
Solution:
- If your knees hurt on the inside, angle the cleats slightly inward (toes outward).
- If your knees hurt on the outside, angle the cleats slightly outward (toes inward).
- Small changes make a big difference—adjust in 1-2mm increments and test the results.
Check Your Pedal Float
Float refers to the small amount of lateral movement allowed by your pedals before they disengage. More float can reduce stress on your knees.
Solution: If your pedal system allows it, consider using cleats that provide more float (e.g., Shimano SPD cleats offer 4° of float).
Ensure Your Shoes Fit Properly
Tight or ill-fitting cycling shoes can contribute to discomfort.
Solution: Loosen your laces/straps slightly or invest in shoes with better arch support.
Take Breaks and Stretch
If your feet or knees feel sore after long rides, give your body time to adjust.
Solution: Try stretching before and after rides to improve flexibility and reduce strain.
Pedals Feeling Too Tight or Too Loose (Adjusting Tension)
Problem: Your pedals feel too tight, making it hard to clip in and out, or they feel too loose, causing accidental disengagement.
Possible Causes & Solutions:
How to Loosen Pedal Tension (Easier Clipping In & Out)
If you feel like you’re finding it hard to clip in or struggling to unclip, your pedal tension is likely too high.
Solution: Use an Allen wrench (or the tool specified for your pedals) to turn the tension screw counterclockwise towards the “-“ symbol (1’click’ turn at a time) to reduce the resistance.
How to Tighten Pedal Tension (Prevent Accidental Unclipping)
If you find your feet popping out of the pedals unintentionally, your tension is probably too low.
Solution: Use an Allen wrench to turn the tension screw clockwise towards the “+” symbol (1’click’ turn at a time) to increase resistance.
Finding the Right Balance
Many beginners start with loose pedal tension to make clipping in and out easier. As you gain confidence, you may want to increase the tension slightly for better pedal engagement.
Solution: Experiment with small adjustments (¼ to ½ turn at a time) until you find your ideal setting.
Final Thoughts
Getting used to clipless pedals will take some trial and error, but most issues can be resolved with small adjustments to your cleats, pedal tension, and technique. If you experience difficulty clipping in or out, foot discomfort, or knee pain, don’t ignore it—making the right adjustments early will improve your riding experience and prevent injury.
With practice and fine-tuning, clipless pedals will become second nature and enhance your cycling efficiency and comfort.
Conclusion: Keep Pedaling and Learning!
Switching to clipless pedals is a big step in your cycling journey, and like any new skill, it takes time to master. Don’t be discouraged if you struggle at first—every cyclist has had their share of awkward falls and wobbly stops! What matters is that you keep practicing, stay patient, and gradually build confidence.
Recap of Key Setup and Safety Tips
Before you head out on your next ride, here’s a quick recap of the most important takeaways from this guide:
- Choose the Right Gear: Make sure your clipless pedals, cleats, and cycling shoes are compatible.
- Install Pedals & Cleats Correctly: Proper positioning helps prevent discomfort and knee strain.
- Adjust Pedal Tension: Start with the easiest setting tAo make clipping in and out easier and smoother.
- Practice Clipping In & Out: Begin in a safe, open space before riding in traffic.
- Anticipate Stops: Always unclip one foot early before coming to a halt.
- Troubleshoot Issues: If you’re having trouble, small adjustments can make a big difference in comfort and performance.
Mastering clipless pedals is all about practice, practice, practice!! So keep practicing, and soon, clipping in and out will feel completely natural. Every rider’s transition to clipless pedals is unique—some pick it up quickly, while others need a little extra time. Before you know it, you’ll be enjoying the improved efficiency and power transfer that clipless pedals provide.